Three-Stage-Progress Rye Bread with Seeds
12/02/2010

800 g whole rye flour, 200 g strong flour, 18 g salt, water & seeds
A little over a month into my bread baking adventure I received The Bread Builder: Hearth Loaves and Masonry Ovens as Xmas gift from Birgit and Bob. I read the book in its entirety, pored over all the charts digesting a huge amount of information on flours, water, salt, temperature, yeast, lactic acid, acetic acid, and eventual natural starter —the soul of sourdough— that raises beautiful artisan bread. Apparently I had learned all sourdough-baking essentials from my very first bread book and gotten enamored with the knowledge that I came away with.

1000 g whole rye flour, 16g salt, and water (original recipe & photo)
Continued baking with commercial yeast over the following few months I kept contemplating more and more about sourdough and in particular rye flour and rye bread because when we talked bread Birgit often reminisced the kind of rye bread she grew up with and how much she had enjoyed it. You see Birgit is not only from East Germany, she happens to be a bread person who knows good bread and often seeks out bakery in every locale that she travels to; furthermore if someone who Fed Exed pain Poilâne across the Atlantic to New York she is definitely serious about bread.
For Birgit’s fondness of bread and myself feeling quite educated about rye and sourdough starter (no, I had not actually ventured into sourdough territory yet) I set out to search for a recipe that would produce the rye bread that Birgit loves and appreciates but could not find in the US.
I came across and studied many rye bread recipes and somehow stumbled upon this. How I love its simplicity: 1000 g whole rye flour, 16 g salt, and water! Inspected closely its method, description and yes, its photograph I decided to settle upon it because it is quite clear to me that this recipe would produce the kind of rye bread that I was after.
So the birth of my very first natural starter –a whole rye– was born and my first loaf of sourdough bread was this Detmold 3-stage-process rye bread baked in a closed-lid pot as it was the only choice available for steam producing during my first year of artisan bread baking.

my first loaf of rye bread baked in an enamel cast-iron pot
It’s a tough love if you are accustomed to fluffier texture and well-risen loaf of its cousin wheat (are they related? one is wheat grain and the other is actually grain from hardy cereal grass) but it makes up for in rich & hearty taste, resistance to stalling, and many health benefits. So I encourage you to try it out to see if you like it and you never know you might fall for it after all.
And if you already like rye bread but dreaded the finicky & temperamental characteristic of rye dough (a gooey mass when you mix rye flour with water; and if you over-kneaded it pentosan gum would leach out of rye granules and turn the dough into a giant sticky mess at which point you would never be able to fix it) ; but fear not, give this 3-stage-method recipe a try to see for yourself it’s not that difficult to arrive at a risen, moist, hearty and beautiful bread.
It’s important that you know a few things uniquely rye (read: pentosan, pentosan gum, gliadin and glutelin, amylase) and how each stage of this method brings out rye’s unique quality to produce a good risen loaf. I’ll delve into that at the end of this post or perhaps devote another separated post about rye, for now enjoy this funky picture of amylase knowing that sourdough and rye is a perfect union to deliver quality rye bread so a mature rye starter is strongly desirable.

α-amylase molecule
So I digress, let’s move on to create the dough and bake some bread, shall we?
What follows is how I have done it a few dozen times as closely as possible to the original recipe accompanied with pictures as it is my wish that you successfully create this wonderful bread.
Preparing the rye sourdough leaven
- Begin at noon by mixing about 30 g of rye sourdough** with 50 g of flour and 55 g of lukewarm water. Place this mixture into a jar that keeps the temperature and humidity, and sprinkle flour on it. Cover the jar with a towel and leave it for 6 hours at 25° C (77° F). (As a result of the fermentation, the temperature inside the jar will be slightly higher.)** If you do not yet have any sourdough, use the following procedure to make it yourself from microorganisms (lactobacilli and yeasts) found in the flour and in the air (the weather should not be hot): Mix 60 g of flour with 85 g of water and leave it covered with a towel for 1 or 2 days (stir it gently once or twice during that time) at 25° C (77° F), until bubbles appear at the surface and it smells a little sour. Refresh this starter sourdough a couple of times according to steps 1 to 3 to get a strong sourdough leaven, the first time using slightly higher temperatures.
- Add 150 g of flour and 90 g of water and mix everything. Sprinkle flour on it and leave it covered for 14 hours at 20° C (68° F).
- Add 300 g of flour and 320 g of lukewarm water. Mix it and sprinkle flour on it. Leave it covered for another 4 hours at 28° C (82° F). (The jar should be large enough for the dough to rise to twice its original volume.
- Put 400 g of flour into a bowl, add the sourdough, 285 g of warm water and 16 g of salt. Knead strongly by hand for 10 minutes.
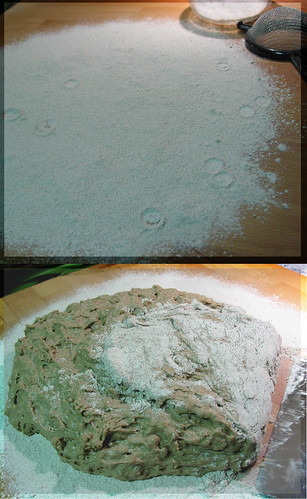
- Sprinkle a small amount of the remaining 95 g of flour on a baking pan, and pour the rest on a work surface. Put the soft, sticky dough on top of it, cover your hands with flour, and put the dough in the shape of a ball by pressing one side of it from the top to the inside and then rotating the dough a little, repeating this several times,
 until most of the flour is in the dough.

folding rye flour into dough
Finally, cover the dough with the small amount of flour that remains, turn it (so the closure is at the bottom), and place it in the prepared couche. Then allow it to rise for 1 hour at 27° C (81° F).

before and after a short 1 hour bulk proofing
(You can also let the bread rise in a special dough rising basket, which should be well dusted with flour. In this case the amount of water in step 4 can be increased by 15 g. Since you do not need the baking pan to let the bread rise, you can further improve the bread by baking it on a baking stone, which you put in the oven during preheating. It is not necessary to sprinkle flour on the stone.)
- Pre-heat the oven to 240° C (465° F).

ready to bake
Invert the dough onto parchment-line peel/inverted baking sheet, carefully peel off the linen and quickly load the dough, parchment and all into the oven heated with a baking stone and bake it for a total of 90 minutes, of which time the first 20 minutes with a lot of steam. Reduce the heat to 160° C (320° F) after that time.
- Put the bread on a rack to cool until the next morning. The weight of the bread is about 1400 g. To eat, cut 1 cm slices and spread butter on them, for example. Only cut as many slices as you want to eat at a time. Keep the bread in a dry place (not in the refrigerator, and not sealed) with the edge you cut from down. The bread stays fresh for about a week. Enjoy the taste of rye!

slicing a boule-shaped bread

crumb

You now have a large amount of fresh rye sourdough*. Take 30 g of it and store it in the refrigerator for the next time.
**There are several methods of preparing rye sourdough. The three-stage progress described here (beginning with a humid stage to increase the yeasts and a cool stage to generate acetic acid) is based on the traditional German method of making sourdough.
Making the bread
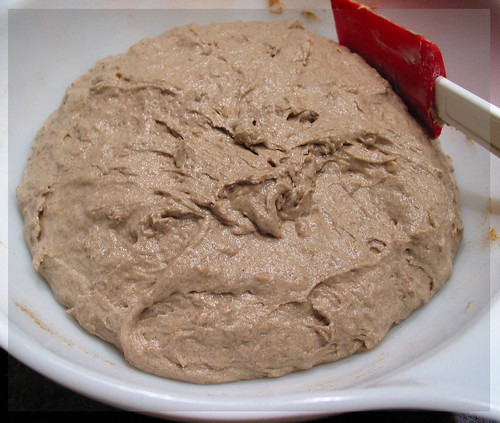
I use a sturdy spatula to fold the dough over itself about 50-75 strokes or until the dough is smooth. You should see gluten development.

gluten development
Then leave the dough covered for 30 minutes at 27° C (81° F). Prepare a linen couche dusted heavily with white flour.
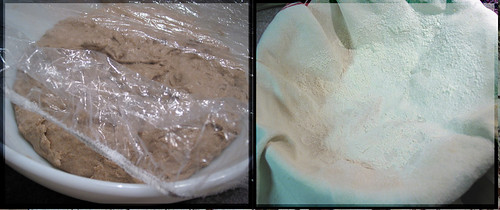
cover dough & prepare floured linen-couche


Modify this recipe to match your taste. Here are some ideas:
Mixed flour bread: Replace some or all the rye flour in steps 4 and 5 with the same amount of wheat flour (bread flour / strong flour / type 55 / type 550). For every 100 g of wheat flour reduce the amount of water (in step 4) by 10 g and the baking time (in step 6) by 5 minutes. You can cut slashes on the top just before baking to increase the amount of crust. If you use a high amount of wheat flour it may be necessary to use a lower baking temperature in the beginning or to turn it down earlier. The bread stays fresh for a couple of days.
Seasoning: In step 4 add a small amount of some of the following ingredients to the dough: coriander, caraway seeds, fennel, sesame seeds, flax seeds, sunflower seeds, pumpkin seeds. (Adjust the amount of flour and water if necessary). Or put caraway seeds, rolled oats, sunflower seeds, sesame seeds or poppy seeds on the top of the bread in step 5.
I am delighted to send this bread to Susan of Wild Yeast Blog who generously hosts the wonderful weekly Yeast Spotting which features collections of yeasted baked goods from amateur bakers, bread enthusiasts and yeast lovers around the world.

Rava dosas, a savory dish that is popular in South India, are crêpes typically made with semolina and rice flours and stuffed with cooked vegetables blended in complex spices that Indian dishes are known for. I visited a local Indian market a while back and brought home a number of herbs and spices as well as various flours, of which, a white coarse semolina, that has waited to be used. So when I saw Rava Dosas featured on Gourmet magazine I could not be happier at a chance to make another Indian dish –second actually– that is everything vegetarian.
That evening I also needed something quick (and tasty) for dinner while waiting to turn, shape and bake this bread. Indeed it only took me an hour or so from washing, chopping, cooking the stuffing and a breeze to make the wrappers. I had some excess sourdough starter (at 100% hydration) so used it in place of the called for all-purpose flour adjusting the amount of water to keep the batter’s consistency as formulated. The batter is very thin; the mixed flour seems to stay at the bottom while the liquid floating above it, so just stir or whisk it well before pouring it into the skillet. The unused batter can be stored, well covered, in the fridge. You can halve or double the recipe. One more thing, you do need a non-stick skillet, absolutely no substitution here unless you don’t mind to wrestle with the dosa and the cooking tool.
I had a delicious meal and plenty more for a few more meals later. I ate the dosas stuffed and also unadorned. The crêpe is quite flavorful –a noticeable sourdough taste– bursting with crunches of cumin seeds. The filling is complexly hearty, as expected of Indian food, with the richness of roasted coconut throughout. It’s definitely a keeper recipe.
Rava Dosas with Potato Chickpea Masala
Recipe from November 2009 Gourmet Magazine
Serve 4; Active Time: 40 minutes; Start to Finish: 1 hour
For Masala Filling
- 1.5 lb Yukon Gold potatoes
1/3 cup dried grated unsweetened coconut
2 teaspoons cumin seeds
1 (3-inch) fresh jalapeño, coarsely chopped, including seeds
1 (2 1/2-inch) piece of peeled ginger, coarsely chopped
3 garlic cloves, smashed
1 Tablespoon curry powder
1/2 teaspoon cinnamon
1/2 teaspoon turmeric
1/3 cup vegetable oil
1 3/4 cups water, divided
1 large onion, chopped (about 3 cups)
1 (15 to 19-oz) can chickpeas, rinsed and drained
1/2 cup frozen peas (do not thaw)
1/2 cup chopped cilantro
For Rava Dosas
- 1/2 cup semolina flour
1/2 cup rice flour –I use brown rice flour–
1/2 cup all-purpose flour (I use 100 g white starter at 100% hydration, 2 Tablespoons all-purpose flour )
1/2 teaspoon cumin seeds
1/2 teaspoon salt
2 cups water (I use 1 3/4 cups plus 2 teaspoons adjusting the water in the starter above)
Vegetable oil for brushing
Making Masala Filling
Peel potatoes and cut into 1 1/2-inch pieces. Transfer to a bowl and cover with cold water.
Toast coconut in a 12-inch heavy skillet over medium heat, stirring occasionally, until golden, about 3 minutes. Transfer to a small bowl and wipe out skillet. Toast cumin seeds in skillet over medium heat, shaking skillet frequently, until fragrant and just a shade darker, about 30 seconds. Transfer to another small bowl. Reserve skillet.
Purée jalapeño, ginger, and garlic in a blender (I used a small food processor) with curry powder, cinnamon, turmeric, oil, 1/4 cup of water, and 1 tsp salt until smooth. Transfer purée to skillet and cook over medium-high heat, stirring, until thickened slightly, about 1 minute. Add onion and cook, stirring occasionally, until it begins to soften, about 8 minutes.
Drain potatoes, then add to onion mixture with cumin seeds and cook over medium heat, stirring occasionally, until potatoes are barely tender, about 10 minutes.
Add chickpeas and remaining 1 1/2 cups of water, scrapping up any brown bits, then briskly simmer, covered, until just tender, about 3 minutes. Remove from heat and stir in toasted coconut and cilantro.
Make dosas while potatoes cook
Whisk flours, cumin seeds, salt, and water in a bowl.
Generously brush a 12-inch nonstick skillet with oil and heat over medium-high heat until it shimmers. Pour 1/2 cup batter into skillet, swirling until bottom is coated. Cook, undisturbed, until dosas is set and edges are golden, about 2 minutes. Flip using a rubber spatula and cook dosa until underside is golden in spots, about 1 minute more. Transfer to a plate. Make more dosas with remaining batter, stacking and covering loosely with foil to keep warm.
To serve, spoon masala filling into dosas.
Cooks’ Note: Masala filling, without coconut and cilantro, can be made 6 hours ahead and chilled. Reheat before stirring in coconut and cilantro.
Mily’s Note: It took me much longer to cook the dosas so cook it to your liking however long it might take.


