Sourdough Pan Siciliano
03/06/2010

sourdough Pan Siciliano
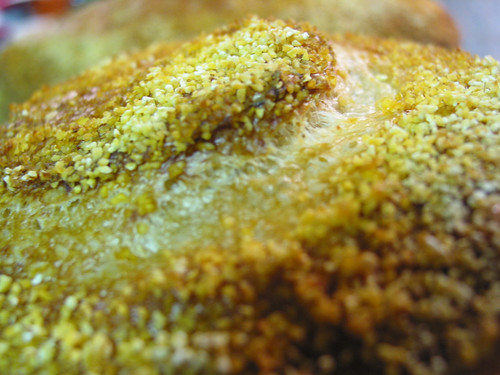
What is Pan Siciliano? It’s a delicious bread from Sicily shaped in the form of an S and has both wheat and semolina flour. Its light crust and crumb, slightly sweetened with just a tad of honey, a bit of olive oil which goes very well with semolina flour, and enriched with crunchy crusted sesame seeds, all together created a light bread that is so unexpectedly wonderful with a subtle hint of sourdough note.
Yes, this particular recipe from Mike’s Sourdough Home caught my attention because its bread is raised completely using sourdough starter so make sure your starter is vigor and strong. I was pretty excited about making this bread the first time for I learned how to shape a baguette, then coil it into an S, painted the loaves with seeds and also learned to be patient waiting over 48 hours before I could bake and taste a completely new bread. Many lessons learned and I thoroughly enjoy the process.
Some of you might not like this bread –Birgit, for instance did not appreciate this bread at all– if you are crusty-sourdough-type of a person. The S-shaped loaves look lovely and I think children would assuringly enjoy this soft bread. I, myself, like to toast this bread very lightly, to not over-dry it, for breakfast munching it over a cup of warm tea.
I converted the original recipe into metric measurement and adjusted it just a bit where I see fit . Let’s make the bread.

sourdough Pan Siciliano
Pane Siciliano
Recipe is from Sourdough Home, which is modified from a recipe in “The Bread Baker’s Apprentice” by Peter Reinhart.
This recipe makes three 400-gram loaves and will take 3 days to finish.
Pate Fermente:
dough hydration is about 58%
240 g mature starter, at 100% hydration; prefer to refresh over 24 hours
45 g/3 Tablespoon water
30 g strong/bread flour
135 g all-purpose flour
2 g/¼ teaspoon salt
Dough:
final dough hydration is about 81%
450 g pate fermente, all the above pate fermente
210 g semolina flour, I use Giusto’s semolina flour and don’t remember whether it’s fine or coarse grind
210 g strong/bread flour
360 g lukewarm water, I use water around 80 ° – 85° F
7 g/ 1 ¼ teaspoon salt
28 g/2 Tablespoons olive oil
20 g/1 Tablespoon honey
Seed:
Raw sesame seeds (optional), highly recommended.
Method:
DAY 1:
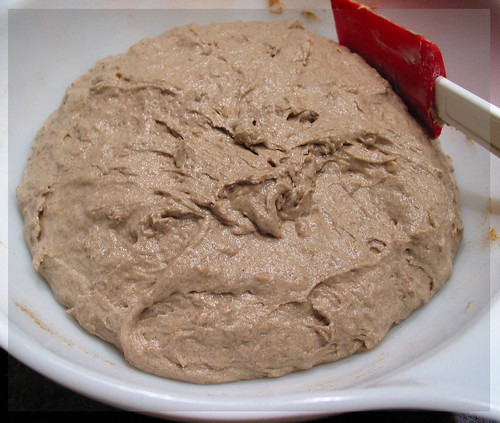
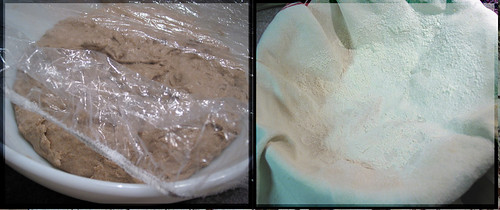
In the afternoon or evening start making the pate fermente by mixing all the ingredients together, knead it a bit to a smooth and firm dough.
Cover it well and allow to rise until almost double. How long this would take depends on how strong your starter is.
Place it in a well-covered container and put it in the refrigerator overnight. The pate fermente can be stored cold for 3 days.
DAY 2:
When you are ready to make the final dough, remove the pate fermente from the refrigerator.
Cut it into small pieces, cover them and let warm up to room temperature, about 1 to 2 hours.
Mix the pate fermente pieces with the water and mix until smooth.
Add the rest of the ingredients and mix well. Cover and let it rest for 20 to 30 minutes to allow the flour to well hydrated.
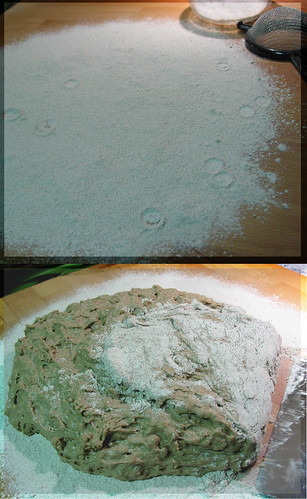
Place the dough on a cool surface and knead well until smooth. This takes about 10 to 12 minutes.
Place the dough in a container, 2.5 times its size. Cover, let it rise for several hours until is almost double.
Prepare a large (half-size) baking sheet lined with parchment paper.
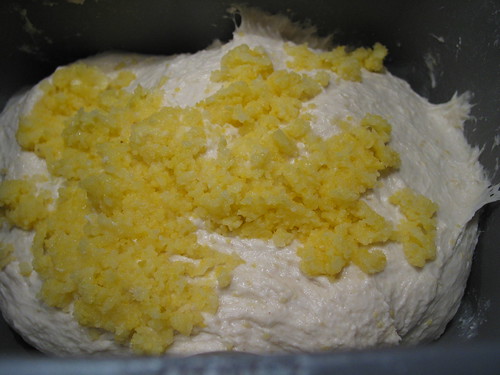
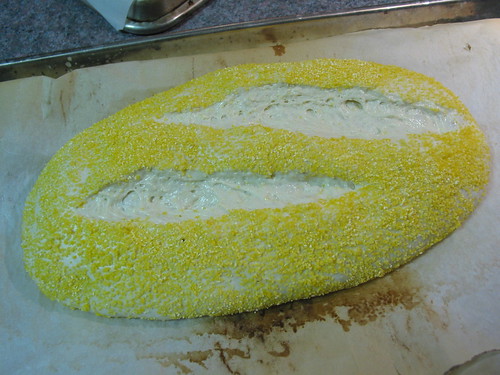
Gently handle the dough, cut it into 3 equal pieces. I weigh the dough pieces. Form the dough into thin baguette.
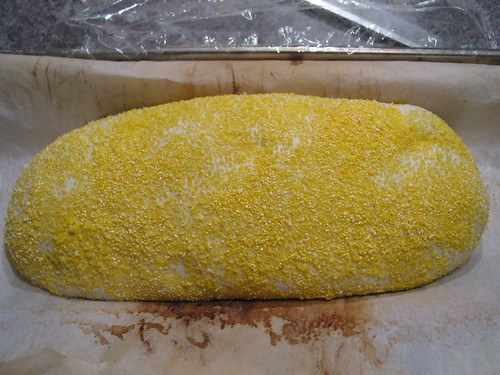
Coil both ends, with each end, in opposite directions into the distinctive shape of this bread.
To do this, grab each end of the baguette with a hand and start coiling the dough from the outside to the center.
Place the shaped loaf on the prepared baking sheet. Cover it with saran wrap. Repeat the shaping for the other 2 loaves.
Mist the loaves with water. I used a spray bottle with a light misty setting.
Sprinkle the loaves with sesame seeds. Loosely cover with saran wrap, put the sheet into a large [garbage] plastic bag and refrigerate overnight.
DAY 3:
In the morning, take the loaves out of the refrigerator. The loaves should have risen a bit during cold storage.
Place the loaves at a warm place and let warm up to room temperature. The loaves will continue to rise.
It takes about 2 hours or until the loaves are light & full of bubbles. Finger test should leave a small dent on the loaves.
About an hour into the proof, carefully spray the loaves with water again and paint them with more sesame seeds. Please do not disturb/deflate
the formed bubbles. Cover again with saran wrap and leave the loaves alone undisturbed.
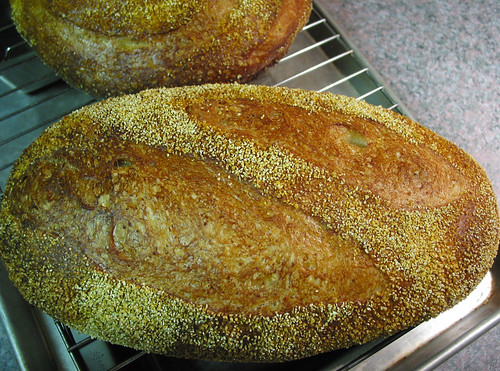
About an hour before the loaves are done, pre-heat the oven to 500° F. Steam is needed so prepare for it now.
Place the loaves on baking sheet in the oven. Turn the oven temperature down to 450° F. Bake with steam for 15 minutes.
Turn the baking sheet 180 degrees so the loaves bake evenly, and bake another 10 to 15 minutes without steam.
When the loaves reach a nice shade of brown, pull it out of the oven. Let it cool on rack for 20 minutes.
Enjoy.
== I am going to dig for more pictures of this bread, please come back to check out.

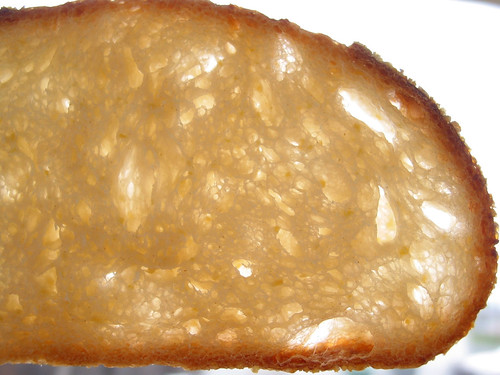
- sourdough Pan Siciliano crumb
I am sending this bread to Yeast Spotting. And I am going to go over there to see other bakers’ breads for the week which has always been a feast for the eyes (and drooling for sure); so please join me.
Norwich Sourdough Boule baked in Dutch Oven
27/05/2010

Norwich Sourdough Boule baked in Dutch Oven

Norwich Sourdough Boule
It’s Hamelman’s Bread‘s Vermont Sourdough, a country white bread. But I did not pay much attention to white bread recipes then until I stumbled upon Susan’s Wild Yeast Blog where the name and the recipe come from.
I did not have any oven set up to bake bread in different shapes other than the forever boule during the first year of my bread baking. I became quite good, if I said so myself, at using the available baking tools at hand, namely my two baking pots, and also at shaping and slashing round boules. Also the first year, I was the sole mixing machine & my elbow grease was wholly responsible for all the bread baked during the said period.
Since my discovery of Susan’s Blog about 2 years ago I’ve become its regular readers. I love to read Susan’s posts, marvel over her beautiful creations, be inspired and to learn much more about bread baking.
I love this no-failed recipe and its tasty outcome. This recipe makes five small-size batards but here I baked in 2 large boules.

Norwich Sourdough Boules
Follow the recipe’s instruction up until shaping. Shape into 2 equal boules by weighing the dough or just eye balled it. Proof in floured linen-lined baskets or couches for a good 1.5 hours at room temperature or until the loaves are light, airy and full of bubbles.
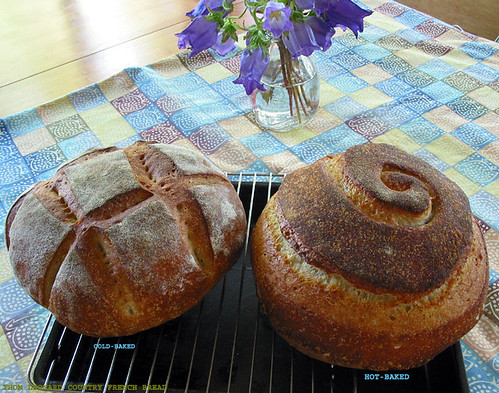
Preheat the oven with two lidded baking cast-iron pots, about 5-6 quart in size, at least 45 minutes before baking. If your oven is not large enough to fit 2 of such pots so have to bake one loaf at a time, place the unbaked loaf in the fridge while the first loaf is in the oven. After finishing baking the first loaf as instructed below, do allow time for the oven, the pot and its lid heated for at least 20 minutes before loading & baking the other loaf.
Bake the loaves for 25-30 minutes with the lid on. Remove the lid and bake for another 20 minutes or so in the pot or remove the pot to bake the loaf in the oven until its crust becomes mahogany dark. Turn off the oven, crack the oven door open, leave the loaf in for another 5 minutes or so to completely dry out the crust. Cool on rack before slicing into it, if you can wait.
Don’t you love the mahogany blistered crust? Even if you don’t normally eat white bread, you would want to try this bread, at least once. Sorry I don’t have any picture of the crumb but here another picture of the grigne:

Norwich Sourdough's "Grigne"; & Crust
I encourage you to bake this bread, and yes, you can bake it in boules and enjoy it with a much thicker crust, if you are a crusty-type bread eater.
I would like to share this recipe at this week’s Yeast Spotting where bread enthusiasts and amateur bread bakers around the globe posting their marvelous recipes and beautiful pictures; please stop by for a baked treat.
I haven’t baked any bread at all the last few weeks but I finally got hold of my starters (white and rye) and brought them with me to the mountains where I am visiting at the moment. I hope to be able to bake some bread, wish me luck, at 7200 feet.
Pane al Cioccolato – Italian Chocolate Bread
28/04/2010

Pane al Cioccolato: dangling chocolate pieces
It’s a little cold this morning –already my 5th day in France being with my wonderful family– in the suburb of SE Paris, so I decide to make another batch of hot chocolate drink for myself and the kids -my niece and nephew– who are sleeping still as it’s early here just past 0700 in the morning. As I travel with my milk frother, chocolate drink can be made just about anywhere to quickly get chocolate into my blood stream. 🙂 Anyway, this “pane al cioccolato” comes to mind as I am sipping the rich, slightly sweet, aromatic and warm chocolate milk wishing a piece of such lovely toast right this minute to dunk into this wonderful drink for a double shot of dark chocolate and yes, more caffeine, not that I need any.
I’d followed & enjoyed Jude of Apple Pie, Patis & Pâté for a while until it has become a ghost blog since July 2009. This recipe and method came from his blog where he posted some great photos of the bread and dough. Browse his site when you have a chance, you would have a fun time as I’ve had.
This bread caught my attention because of the one single ingredient namely chocolate, secondly the natural starter used in –as with most Italian bread– its biga, an equivalence of [French/Polish?] poolish, made with a lower-than-100-percent sourdough starter resulting in a doughy biga naturale and thirdly it can be done within a day after mixing the biga the previous night.
Pane al Cioccolato /Italian Chocolate Bread
recipe from Apple Pie, Patis & Pâté , which adapted from Michel Suas’ Advanced Bread and Pastry
makes two 375 gram / 13.25 ounce loaves
For the Biga Naturale / Wild Yeast Starter:
Ingredients
- 28 grams of starter (50% hydration), fed and active
- 32 grams (1/4 cup) bread flour
- 18 grams water, at room temperature
Mix the biga naturale ingredients until the ingredients are evenly distributed.
Place the biga naturale in a bowl and cover. Let it ferment at room temperature (70 – 75° F) for about 8 hours before using in the final dough.
Final Dough Formula:
Ingredients
- All of the biga naturale, cut into small pieces
- bread flour 393 grams (3 cups)
- water 248 grams (1 1/8 cups)
- instant yeast 1/4 teaspoon
- honey 71 grams (4 TBSP)
- vanilla extract 1 TBSP
- cocoa powder 25 grams (4 TBSP)
- sea salt 10 grams (2 tsps)
- chocolate chips 78 grams – I used Scharffen Berger’s 72% chocolate, chopped into small pieces
Method:
Mix all of the ingredients (except the chocolate chips) until evenly incorporated. Knead 8 to 10 minutes by a mixer until it reaches medium-gluten development. Rest 5 minutes. Fold in the chocolate chips by hand or by machine at low-speed for about a minute or until the chocolate chips are thoroughly incorporated.
Proof the dough for 2 hours at room temperature in a lightly oiled bowl; if your starter is not as mature to start with it might take longer.
Divide the dough into 2 equal portions about 454 grams each. Pre-shape lightly, cover with saran wrap and let rest for 20 minutes.
Shape into batard or ball. Let them proof at room temperature for about 3 hours or longer until it’s light and filled with lots of air bubbles.
About 45 minutes before the proofing is done, pre-heat the oven with baking stone/tiles to 400 °F (204° F). Prepare steam for the bake.
Slash 2 almost-parallel cuts at 15 – 20 degree angle to create flaps over the dough. Load the loaves onto the pre-heated stone, apply steam, close the oven door and bake for 20 minutes. Rotate the loaves, remove steam, and bake for another 15 to 20 minutes.

pane al cioccolato

Pane al Cioccolato open “grigne”
It tastes airily light with a soft crust, a chewy crumb and melted dark chocolate in every bite. Serve this bread as breakfast and/or dessert with milk or your preferred drink. Enjoy.

Italian Chocolate Bread: Crumb
I couldn’t decide if this is rich-dough or lean-dough bread. It started out as a lean dough with all the basic ingredients and a little bit of honey; however the [dark] chocolate has pushed it away from being lean so it’s rich bread then –Decision reached–.
I am pleased to send this bread to Yeast Spotting to share with other bread enthusiasts. Please visit the site to enjoy this week’s wonderful bakes as well as those in the archives. You will have a fun time there, I promise, would most likely go away with a bread or two to bake over the weekend.

pane al Cioccolato: toast
Della Fattoria’s Polenta Sourdough
02/03/2010
polenta-crusted Sourdough
Having made a few loaves of seeded whole wheat bread of late, I decided to make a white sourdough for a change. Della Fattoria is a small bakery in Petaluma in northern California whose breads are of very good artisan-quality and beautifully created. There are two recipes from the bakery listed in Artisan Baking Across America, I already made the roasted garlic sourdough one and this polenta-crusted sourdough is the other. Although it’s categorized as advanced I don’t think it’s difficult to make. If you have already created a few artisan loaves and have a mixer then you are good to go. What draws my attention is the crusted polenta spiraling on top of the loaf; that means I got to slash a spiral, which I had only done once before. I make one boule and one batard and the boule is a gift to a friend. Here is the recipe and how I did it. Let’s bake some golden polenta-crusted sourdough.
Della Fattoria’s Polenta Sourdough
Recipe in Artisan Baking Across America
Yield two 600-gram loaves
Time: It takes me 30 hours, of which about 45 minutes of hand-on work.
The Levain
| Ingredient | Weight | Bakers Percentage |
|---|---|---|
| Fermented Firm Sourdough Starter | 20 g | 20% |
| Water, lukewarm | 60 g | 60% |
| Unbleached bread flour (13.3% protein) | 100 g | 100% |
| Total weight: 315 grams | ||
The Polenta
| Ingredient | Weight | Bakers Percentage |
|---|---|---|
| Coarse Polenta | 35 g | 100% |
| Cold Water | 175 g | 500% |
The Dough
| Ingredient | Weight | Bakers Percentage |
|---|---|---|
| Water, cold | 390 g | 65% |
| Unbleached Bread Flour (11.5% to 12% protein) | 265 g | 44% |
| Unbleached high–gluten Flour (13% – 14% protein) ** | 335 g | 56% |
| Fermented Levain | 30% | |
| Salt | 18 g | 3% |
| Cooled Polenta | 35% | |
| Total weight: 1,540 grams | ||
Garnish
Coarse polenta for coating the dough.
** I added 1/2 teaspoon of wheat gluten flour (72% protein) & mixed well to make called-for high gluten four
Method:
1. Refresh your sourdough starter 2 days before baking with it, about 3 to 4 times.
2. Mix the levain and let it ferment overnight for 8 hours until it has expanded quadruple.
3. The next morning, cook the polenta and water in small heavy pan, stirring constantly, until the mixture is very thick, about 3 minutes. Spread it out on a plate to cool to room temperature.
5. Mix the cold water and the flour into a rough dough. Let it autolyse for 20 minutes.
6. Mix the dough with a mixer on medium speed until the dough is very smooth. It takes me 10 minutes.
7. Add salt and levain and continue mixing until the dough is firm and smooth.
mix in the polenta
8. Add the cooked polenta in bits and mix until it is fully incorporated. The dough becomes wet but not too sticky.

wet dough after mixing in the cooked polenta
9. Place the dough in a covered container at least 3 times its size. Let it ferment until it is airy and well expanded, about 3.5 hours.
1o. Turn the dough 3 times at 30 minutes interval, that is, after 30, 60, and 90 minutes of fermenting. Give the dough another turn if you think it needs it. Then leave it undisturbed for the remaining time.

dough after 3 turns
11. Flour your work surface and the dough and turn it out. Cut the dough in half, each piece weighs about 650 grams. Lightly round the pieces and cover loosely with plastic wrap. Let them rest for 15 to 20 minutes.
12. Carefully shape the dough into even and tight round loaves without deflating them. I shape a round loaf and a batard loaf. Place the loaves on baking sheets lined with parchment paper. Spray or pain their top with water, and lightly sprinkle the coarse polenta to coat them all over.
For the round loaf I proof it in a plastic colander, right side down like this:

proofing round loaf in colander
13. Cover the loaves with plastic wrap and proof until it is well expanded, about 2.5 to 3 hours.
airy & well-expanded batard loaf decorated with raw polenta
14. At least 45 minutes before the dough is fully proofed, pre-heat the oven with baking stone to 425 degrees F (220 degrees C). Prepare steam.
15. Slash a spiral on top of the round loaf begin at the bread’s center and holding the razor almost horizontally, turn the bread on its parchment while you cut the spiral.
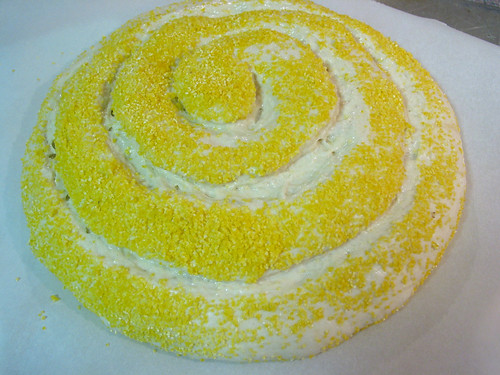
spiral-slashed loaf
slashed batard loaf
16. Load the bread with parchment on the baking stone. Bake the loaves with burst of steam for the first 15 minutes, and without steam for 30 – 35 minutes more, until they turn dark brown evenly. Rotating them halfway into the bake. Turn the oven off, leave the loaves in with the oven door crack open.
17. Let the breads cool completely on a wire rack.

spiral-slashed round loaf
batard-shaped loaf
18. Enjoy.
I have always wanted a picture of a slice of artisan bread held up so that light can shine through its lacy crumb, like those shown in artisan bread book. So with this bread, the opportunity has arrived. Can you see the polenta pieces nested inside the wall of the crumb?
crumb laced with coarse polenta pieces
I am sending this to Yeast Spotting; see you over there.
Three-Stage-Progress Rye Bread with Seeds
12/02/2010

800 g whole rye flour, 200 g strong flour, 18 g salt, water & seeds
A little over a month into my bread baking adventure I received The Bread Builder: Hearth Loaves and Masonry Ovens as Xmas gift from Birgit and Bob. I read the book in its entirety, pored over all the charts digesting a huge amount of information on flours, water, salt, temperature, yeast, lactic acid, acetic acid, and eventual natural starter —the soul of sourdough— that raises beautiful artisan bread. Apparently I had learned all sourdough-baking essentials from my very first bread book and gotten enamored with the knowledge that I came away with.

1000 g whole rye flour, 16g salt, and water (original recipe & photo)
Continued baking with commercial yeast over the following few months I kept contemplating more and more about sourdough and in particular rye flour and rye bread because when we talked bread Birgit often reminisced the kind of rye bread she grew up with and how much she had enjoyed it. You see Birgit is not only from East Germany, she happens to be a bread person who knows good bread and often seeks out bakery in every locale that she travels to; furthermore if someone who Fed Exed pain Poilâne across the Atlantic to New York she is definitely serious about bread.
For Birgit’s fondness of bread and myself feeling quite educated about rye and sourdough starter (no, I had not actually ventured into sourdough territory yet) I set out to search for a recipe that would produce the rye bread that Birgit loves and appreciates but could not find in the US.
I came across and studied many rye bread recipes and somehow stumbled upon this. How I love its simplicity: 1000 g whole rye flour, 16 g salt, and water! Inspected closely its method, description and yes, its photograph I decided to settle upon it because it is quite clear to me that this recipe would produce the kind of rye bread that I was after.
So the birth of my very first natural starter –a whole rye– was born and my first loaf of sourdough bread was this Detmold 3-stage-process rye bread baked in a closed-lid pot as it was the only choice available for steam producing during my first year of artisan bread baking.

my first loaf of rye bread baked in an enamel cast-iron pot
It’s a tough love if you are accustomed to fluffier texture and well-risen loaf of its cousin wheat (are they related? one is wheat grain and the other is actually grain from hardy cereal grass) but it makes up for in rich & hearty taste, resistance to stalling, and many health benefits. So I encourage you to try it out to see if you like it and you never know you might fall for it after all.
And if you already like rye bread but dreaded the finicky & temperamental characteristic of rye dough (a gooey mass when you mix rye flour with water; and if you over-kneaded it pentosan gum would leach out of rye granules and turn the dough into a giant sticky mess at which point you would never be able to fix it) ; but fear not, give this 3-stage-method recipe a try to see for yourself it’s not that difficult to arrive at a risen, moist, hearty and beautiful bread.
It’s important that you know a few things uniquely rye (read: pentosan, pentosan gum, gliadin and glutelin, amylase) and how each stage of this method brings out rye’s unique quality to produce a good risen loaf. I’ll delve into that at the end of this post or perhaps devote another separated post about rye, for now enjoy this funky picture of amylase knowing that sourdough and rye is a perfect union to deliver quality rye bread so a mature rye starter is strongly desirable.

α-amylase molecule
So I digress, let’s move on to create the dough and bake some bread, shall we?
What follows is how I have done it a few dozen times as closely as possible to the original recipe accompanied with pictures as it is my wish that you successfully create this wonderful bread.
Preparing the rye sourdough leaven
- Begin at noon by mixing about 30 g of rye sourdough** with 50 g of flour and 55 g of lukewarm water. Place this mixture into a jar that keeps the temperature and humidity, and sprinkle flour on it. Cover the jar with a towel and leave it for 6 hours at 25° C (77° F). (As a result of the fermentation, the temperature inside the jar will be slightly higher.)** If you do not yet have any sourdough, use the following procedure to make it yourself from microorganisms (lactobacilli and yeasts) found in the flour and in the air (the weather should not be hot): Mix 60 g of flour with 85 g of water and leave it covered with a towel for 1 or 2 days (stir it gently once or twice during that time) at 25° C (77° F), until bubbles appear at the surface and it smells a little sour. Refresh this starter sourdough a couple of times according to steps 1 to 3 to get a strong sourdough leaven, the first time using slightly higher temperatures.
- Add 150 g of flour and 90 g of water and mix everything. Sprinkle flour on it and leave it covered for 14 hours at 20° C (68° F).
- Add 300 g of flour and 320 g of lukewarm water. Mix it and sprinkle flour on it. Leave it covered for another 4 hours at 28° C (82° F). (The jar should be large enough for the dough to rise to twice its original volume.
- Put 400 g of flour into a bowl, add the sourdough, 285 g of warm water and 16 g of salt. Knead strongly by hand for 10 minutes.
- Sprinkle a small amount of the remaining 95 g of flour on a baking pan, and pour the rest on a work surface. Put the soft, sticky dough on top of it, cover your hands with flour, and put the dough in the shape of a ball by pressing one side of it from the top to the inside and then rotating the dough a little, repeating this several times,
 until most of the flour is in the dough.

folding rye flour into dough
Finally, cover the dough with the small amount of flour that remains, turn it (so the closure is at the bottom), and place it in the prepared couche. Then allow it to rise for 1 hour at 27° C (81° F).

before and after a short 1 hour bulk proofing
(You can also let the bread rise in a special dough rising basket, which should be well dusted with flour. In this case the amount of water in step 4 can be increased by 15 g. Since you do not need the baking pan to let the bread rise, you can further improve the bread by baking it on a baking stone, which you put in the oven during preheating. It is not necessary to sprinkle flour on the stone.)
- Pre-heat the oven to 240° C (465° F).

ready to bake
Invert the dough onto parchment-line peel/inverted baking sheet, carefully peel off the linen and quickly load the dough, parchment and all into the oven heated with a baking stone and bake it for a total of 90 minutes, of which time the first 20 minutes with a lot of steam. Reduce the heat to 160° C (320° F) after that time.
- Put the bread on a rack to cool until the next morning. The weight of the bread is about 1400 g. To eat, cut 1 cm slices and spread butter on them, for example. Only cut as many slices as you want to eat at a time. Keep the bread in a dry place (not in the refrigerator, and not sealed) with the edge you cut from down. The bread stays fresh for about a week. Enjoy the taste of rye!

slicing a boule-shaped bread

crumb

You now have a large amount of fresh rye sourdough*. Take 30 g of it and store it in the refrigerator for the next time.
**There are several methods of preparing rye sourdough. The three-stage progress described here (beginning with a humid stage to increase the yeasts and a cool stage to generate acetic acid) is based on the traditional German method of making sourdough.
Making the bread
I use a sturdy spatula to fold the dough over itself about 50-75 strokes or until the dough is smooth. You should see gluten development.

gluten development
Then leave the dough covered for 30 minutes at 27° C (81° F). Prepare a linen couche dusted heavily with white flour.
cover dough & prepare floured linen-couche


Modify this recipe to match your taste. Here are some ideas:
Mixed flour bread: Replace some or all the rye flour in steps 4 and 5 with the same amount of wheat flour (bread flour / strong flour / type 55 / type 550). For every 100 g of wheat flour reduce the amount of water (in step 4) by 10 g and the baking time (in step 6) by 5 minutes. You can cut slashes on the top just before baking to increase the amount of crust. If you use a high amount of wheat flour it may be necessary to use a lower baking temperature in the beginning or to turn it down earlier. The bread stays fresh for a couple of days.
Seasoning: In step 4 add a small amount of some of the following ingredients to the dough: coriander, caraway seeds, fennel, sesame seeds, flax seeds, sunflower seeds, pumpkin seeds. (Adjust the amount of flour and water if necessary). Or put caraway seeds, rolled oats, sunflower seeds, sesame seeds or poppy seeds on the top of the bread in step 5.
I am delighted to send this bread to Susan of Wild Yeast Blog who generously hosts the wonderful weekly Yeast Spotting which features collections of yeasted baked goods from amateur bakers, bread enthusiasts and yeast lovers around the world.


